
A couple weeks ago I did an Inspirations post on Farmhouse/Rustic Kitchen Tables, now today in this post I am showing you my own Modern Farmhouse Kitchen Table, and steps you can follow to create a similar one yourselves. I've even included the recipe for the custom stain colour I made (real simple) so you can mix up some for yourself if you really love the look of my stained tabletop. Let's take a look at the project, shall we?

I did create mine by "hacking" an IKEA table (more info on that later) but, as I alluded to in the title of this post, you can really follow the same steps to get the same look on any wood table! You just have to make sure that, if you aren't starting with bare wood, that you prep your table appropriately. If you aren't quite sure how to do that and you'd like additional details on how you can do it, then check out this post, Kitchen Table & Chairs Refinished, detailing the process my mom and I went through to completely prepare and re-finish her dining table set.
So now let's take a look at a list of the things I recommend for this project. Again, if you're re-finishing a table, use the post mentioned above in conduction with this one to complete your table project, and you'll need pretty well the same supplies.

SUPPLIES YOU'LL NEED
- Table to finish or re-finish (I used an IKEA NORNÄS Table)
- Pencil
- Drill or Screwdrivers (or both) with appropriate heads (I only needed a phillips head)
- Palm Sander and/or Sanding Block (both is best) - I like this palm sander
- Sandpaper (a couple between 180 Grit and 320 Grit)
- Tack Cloths (2 or 3)
- Wood Stain (Minwax Classic Grey and Espresso if you want the same as mine - 236mL cans)
- Primer (I recommend Bulls Eye 1-2-3 or BIN2...forgot to put it in the photo...oops)
- Furniture Paint (I used Advance by Benjamin Moore [Pearl Finish] in Simply White which is so beautiful)
- Polyurethane (1 quart - I used Minwax Water Based Oil-Modified Polyurethane in Clear Satin)
- Clean Rags
- Paint Brushes
- Mini Microfibre Roller Covers (the part that rolls the paint)
- Mini Paint Roller (the part that the covers slide on to)
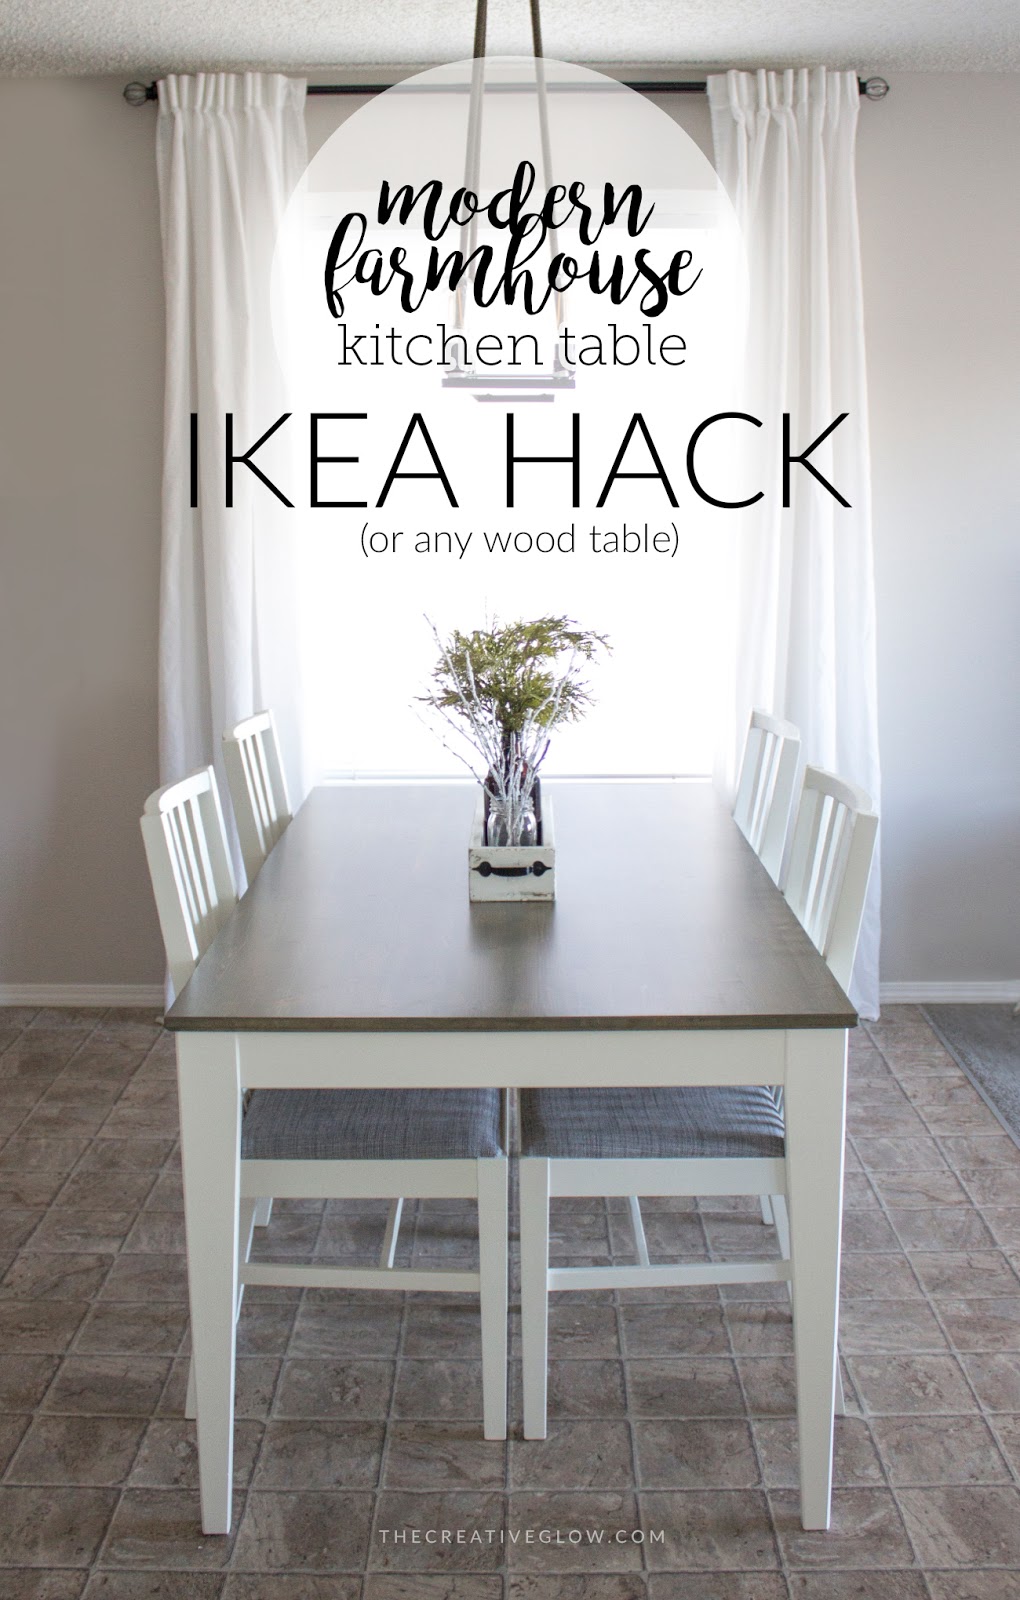
Now, I was completely prepared to make my own table from scratch, and was actually quite excited about it!! But then Thanksgiving was just about upon us, and my step-dad was going to be joining us for the big turkey dinner as he normally does, so we really needed a place to serve and eat that wonderful dinner. I knew I needed to save money--you know how it is after buying a house--so I was searching for a second-hand table that would be suitable, but with no real luck; everyone seems to think they've got gold! Anyway, IKEA was having their Kitchen Table Event (or something like that) and we got lucky and found this baby for just over $200, AND my step-dad treated us as a house-warming gift, all we had to do was buy the chairs! BAM!; someplace to sit and stuff our bellies at for Thanksgiving and an awesome project to feature on the blog - Yessss! I present to you the IKEA NORNÄS Drop-leaf Table and BEFORE photo.

Hey, you! Stop looking at that mess behind the table... that is not the point!! But seriously, do try to ignore that; if you've been following the blog you know that we're new to our own house and have lots of projects on the go, so that's all project supplies! Anyway...
The first thing I recommend you do is completely disassemble the table, and luckily it's really simple! You could get away with leaving it assembled but disassembling will leave you with a much neater look, and less pain in the butt, hassle, and frustration; trying to make sure you don't get stain where it shouldn't be or paint where it shouldn't be is just an unnecessary headache!
If you're starting this project out of the box (with a NORNÄS table) then your table legs will be separate from your table-top section already. If your table is already assembled like mine (so we could use it for dinner), NORNÄS or any other table, then start by removing the legs of your table. And keep in mind that with most furniture there is a way for you to disassemble it weather it's an IKEA piece or not. Once you're down to legs and a table-top section you're going to want to remove the apron part from around the edge of your table. Make sure to tip your table-top one it's side (or upside down if that's easier) and number each piece of the apron (1, 2, 3, 4) and under the table with corresponding numbers so you can put all the pieces back where they belong when you re-assemble.

Now use a drill with a screwdriver bit, or a screwdriver, to remove all the screws that secure the apron to the table-top and then separate the apron frame from table-top.

Next, remove all 4 screws from each of the corner brackets that hold the apron together so you end up with 4 separate pieces of wood. It's a good idea to put all the hardware and screws you removed from the table into a plastic baggy so you don't lose anything.

Now you'll need to prepare your wood for staining. I'm only staining the table-top so I gave it a quick and light sanding with my palm sander - don't forget the leaf!! If you don't have a palm sander (we bought one because I plan on doing lots of wood projects) you can give it a light sanding by hand with a sanding block. Just make sure to use a fine grit paper (the higher the number, the finer the grit) like a 180 grit. If you plan on staining your entire table then you'll need to do the same to your legs and apron pieces as well.
Once sanding is done you'll need to have a dust-free surface so brush away any dust from your table top and leaf (or anything you sanded), and then wipe the entire surface to be stained with a tack cloth. DO NOT use anything damp to wipe the dust, it will raise the grain of your wood, and it'll no longer be nice and smooth and level. Now you're ready for staining. I did a few tests before I started because I didn't want too much stain absorbed into the surface. Based on the results of my tests, I did not follow the usual instructions for staining (from the can), I dipped my rag in stain then applied it and scrubbed it into the wood all at once. Make sure to apply your stain in the same direction as the wood grain.
I used a combination of Minwax Classic Grey (7 parts) and Minwax Espresso (1 part) to come up with this beautiful warm grey stain. This photo doesn't do it justice, it looks much warmer than it actually is because the photos were not taken in natural lightening and at night so I could only edit them to a more accurate cast so much. But...

The following photos are taken in natural light during the day after the stain had dried, and is what you can expect if you follow my recipe and application process. I only did one coat because, as I said, I wanted a lighter look.
I allowed the top of my stained pieces to dry overnight (at least 6 hours are necessary), and then I flipped it over and stained just around the perimeter a few inches wide so that when the apron is attached again, the little bit of edge that is visible will be finished. Why didn't I just stain the entire back? Because it's simply a waste of stain and precious time; it will never be seen unless someone is under the table or lying on the floor next to the table... if this ever occurs in your home, with exception of a child, you've likely fed said person too many... adult beverages - stop!

The next step is to seal your table so that it will be wipeable--we all know how important that is for a dining table--and a little more durable.
I applied 3 coats of a water based polyurethane, sanding between each coat with a 320 Grit (220 will work), and wiping with a tack cloth after each sanding. I wasn't able to get photos of me applying the polyurethane because it has to be done very quickly, without a break, so that you can maintain a wet edge throughout the entire process; you don't want to be brushing over areas that have begun drying, and that happens very quickly. I worked in 4 inch wide sections, apply it very quickly, down the length of the table (always apply it with the grain), making sure to apply a generous amount so that it would stay wet long enough to start my next 4 inch wide section.
In case you're wondering, I chose a water based polyurethane because I didn't want the warming or yellowing effect that oil based polyurethanes have on wood. And the oil based polyurethanes will continue to warm up more and more with age - not what I want. I also chose to go with a satin finish because I didn't want a glossy look; if I could have left it bare I would have, but that's just not a good idea with a table that will get a lot of use and will probably endure a view spills and food splatter.

Now, for the parts I wanted to paint, since the wood is bare on the NORNÄS you don't need to sand them first, you just need a good coat of primer. But you do want to make sure they are dust free so wipe them down with your tack cloth before priming.
Again, if you're working with an older table that you're re-finishing, take a look at this post for instructions on what to do - Kitchen & Table Chairs Refinished.
I wanted the back side of the leaf to be white as well so that when it is hanging and not in use the under-side will look finished, and also blend in with the rest of the light decor in my house. So that will also need to be primed if you plan on doing the same, only the stain needs to be dry first since you'll probably have ended up with stain on the under-side of your pieces from staining the edges. You can wait and prime all of your pieces at once, or do your legs and apron pieces while your stain dries, and then prime the back of your leaf once it's ready. I chose to sand off the stain from the under-side of the leaf, but I don't think it's necessary if you're using a good primer.

Apply one coat of primer to each side of your legs and wood pieces, letting one side dry completely before flipping your pieces over to coat the other side. Don't coat all sides at one time, they will stick to whatever you're laying them on, and you'll ruin the finish of your pieces and have to sand and try again. And, obviously, you only need to coat one side of the leaf since the other side is already stained, so no flipping there.

Once the primer is fully dried as per the directions, you can paint these pieces. I did 2 coats on all my painted parts and the back of the leaf. I used a brush at first but felt the paint levelled out much nicer with a roller--go figure--so I finished with a mini microfibre roller. Try your best to notice any build-up of paint on the top of your legs, or edges of your apron pieces, that will need to be flush against the bottom of your table-top when reassemble, and wipe those away. Once your paint is completely dry--I'd give the paint a few days to begin curing--if you still ended up with build up, or missed any spots of build-up, then you can use a scraper to lightly scrap those areas flush again. Just be careful not to gouge the wood or scrape away the wood; if your scraper begins to sink into the wood then stop immediately and try again at a shallower angle.

At his point you're ready to re-assemble your table and marvel at your beautiful creation: your new Modern Farmhouse Kitchen Table done by YOU! That's pretty exciting, right? And you probably still have all your hair and engaged in little to no screaming (hopefully) with the help of these directions! Phew!

That's it, folks! I hope you enjoyed this project and felt the confidence to do-it-yourself! I'll have lots more projects like this one coming up on the blog in a little bit - for now I'm diving into Christmas themed projects - stay tuned!!
Related Tutorials:
DIY Rustic Drawer-Box Table Centerpiece
Related Tutorials:
DIY Rustic Drawer-Box Table Centerpiece
Sam ♡
Great project! Are those IKEA chairs as well?
ReplyDeleteThank you!!! Yes, the chairs are from IKEA as well, but they came the way you see them. I may eventually change the fabric on the chairs, but they work for now! :)
ReplyDeleteIt's practical as well as pretty and the wipe-clean surface makes life much easier as spillages can be quickly dealt with. You can use fabric in other parts of your vintage kitchen too. best countertop water filter
ReplyDelete